Telephone contact
You can reach us by telephone at any time.

Are you looking for quick help with Exchange Online and Outlook? Then you've come to the right place. Our step-by-step instructions and practical tips will help you with typical tasks such as sharing calendars, retrieving external emails or migrating mailboxes to the cloud.
Learn how to conveniently import contacts via CSV file or share calendars with other people – both in the web version of Outlook and in the desktop application for Windows and macOS.
In this FAQ, we explain how you can easily import your contacts using a CSV file in Editions, Microsoft 365, Editions, and Office 365. Before importing contacts, you should first export the contacts from another email service to a CSV file. Once you have saved the CSV file on your local computer, you can begin importing the contacts. Follow these steps to achieve your goal:
Step 1: Sign in to Microsoft 365 or Office 365.
Step 2: Click on the "All Apps" button.
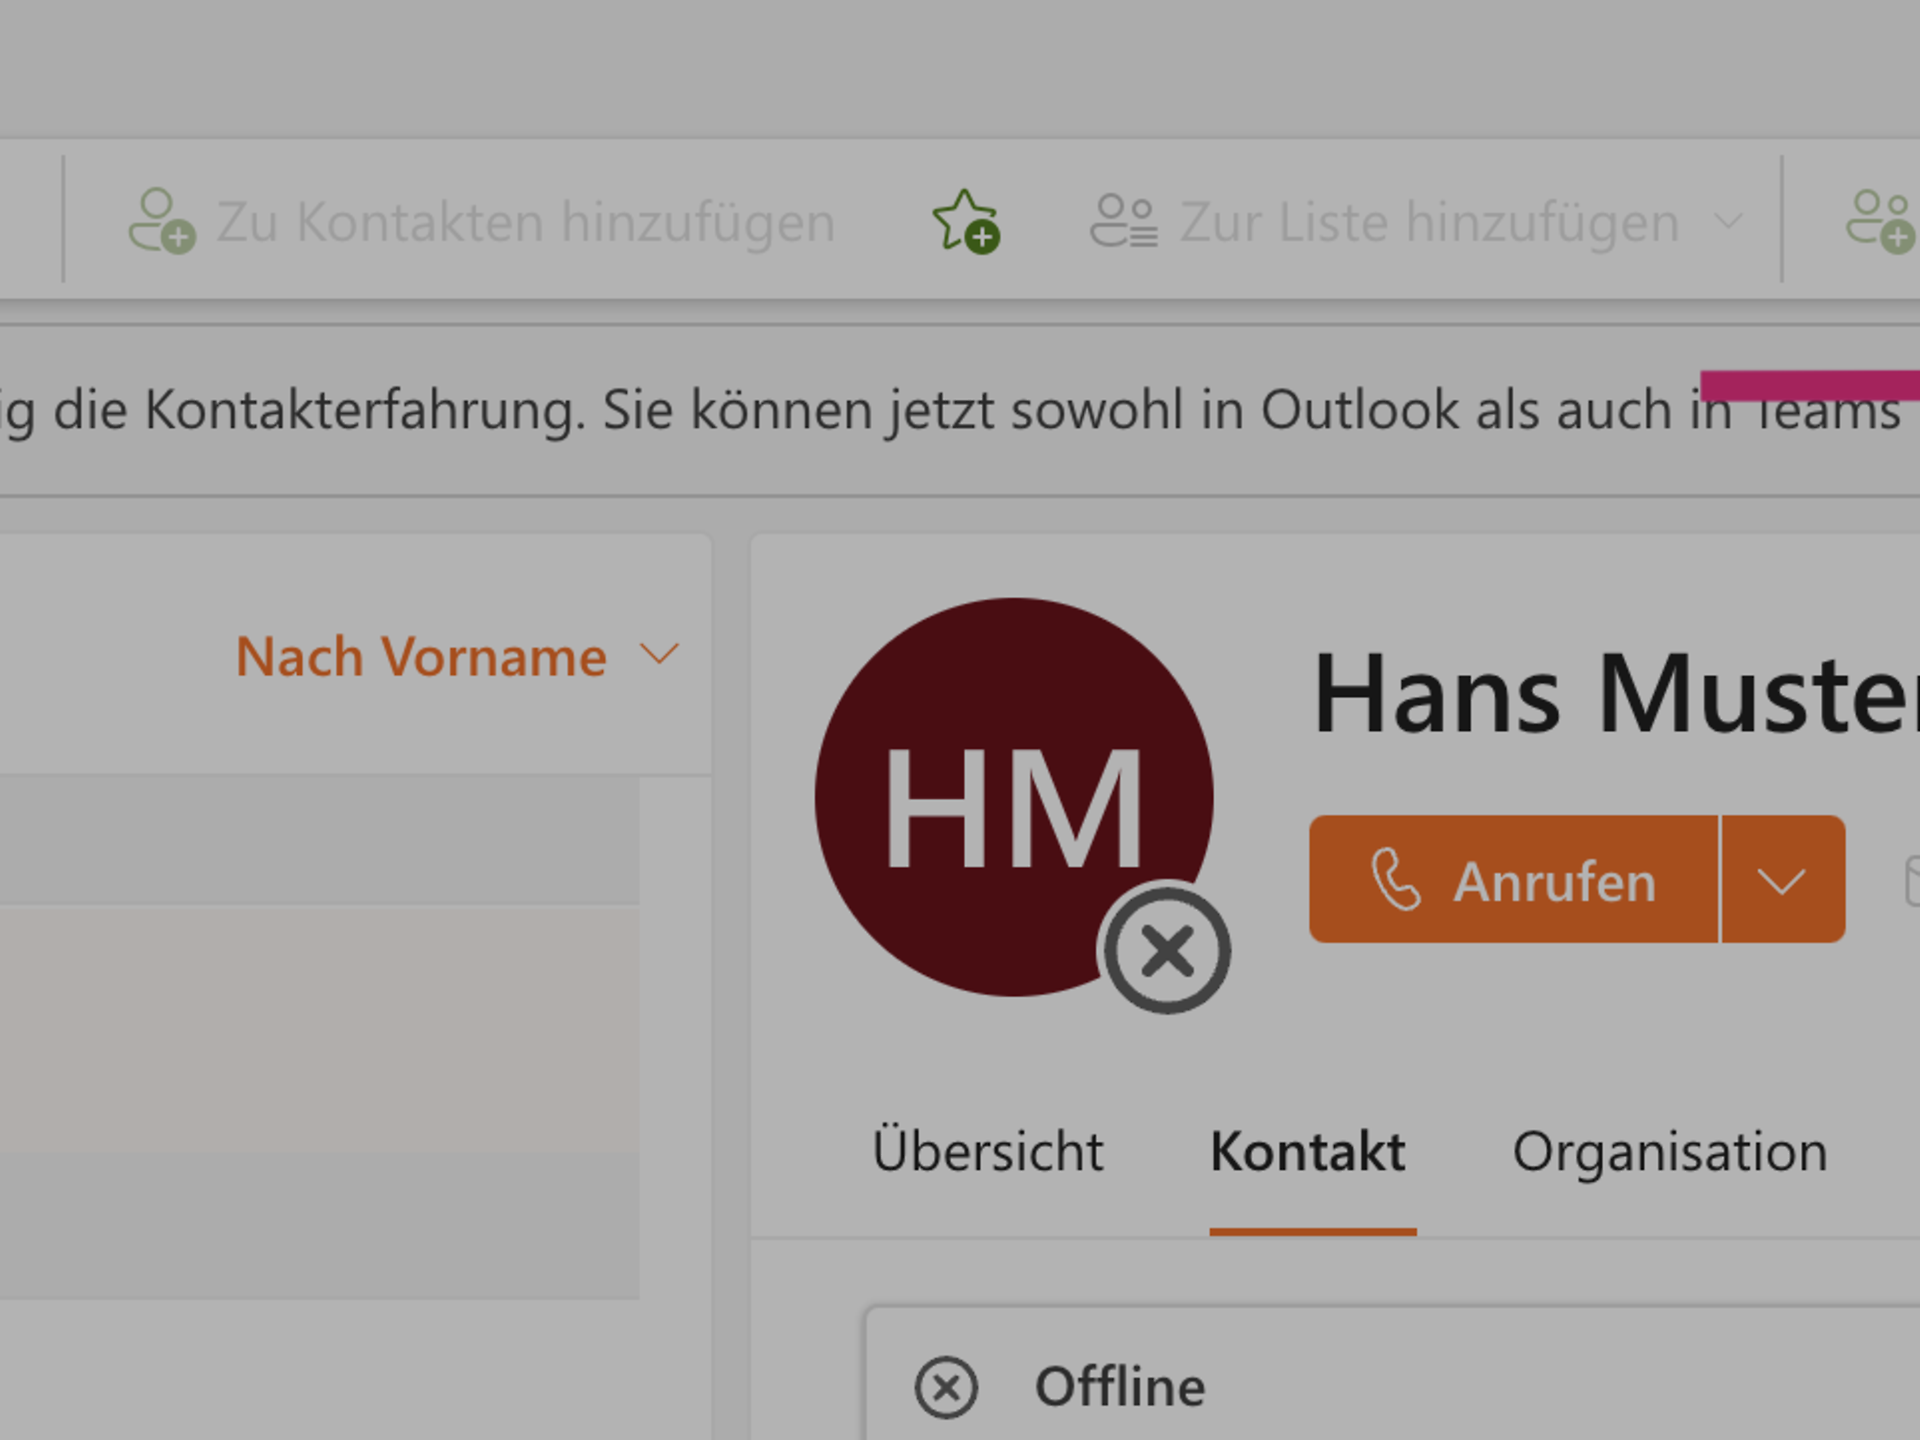
Step 3: In the next menu, scroll down to "All Apps" and click on the "People" button. Alternatively, you can switch to the Contacts tab in Outlook.
Step 4: Now click on "Manage" in the top right-hand corner and then on "Import contacts".
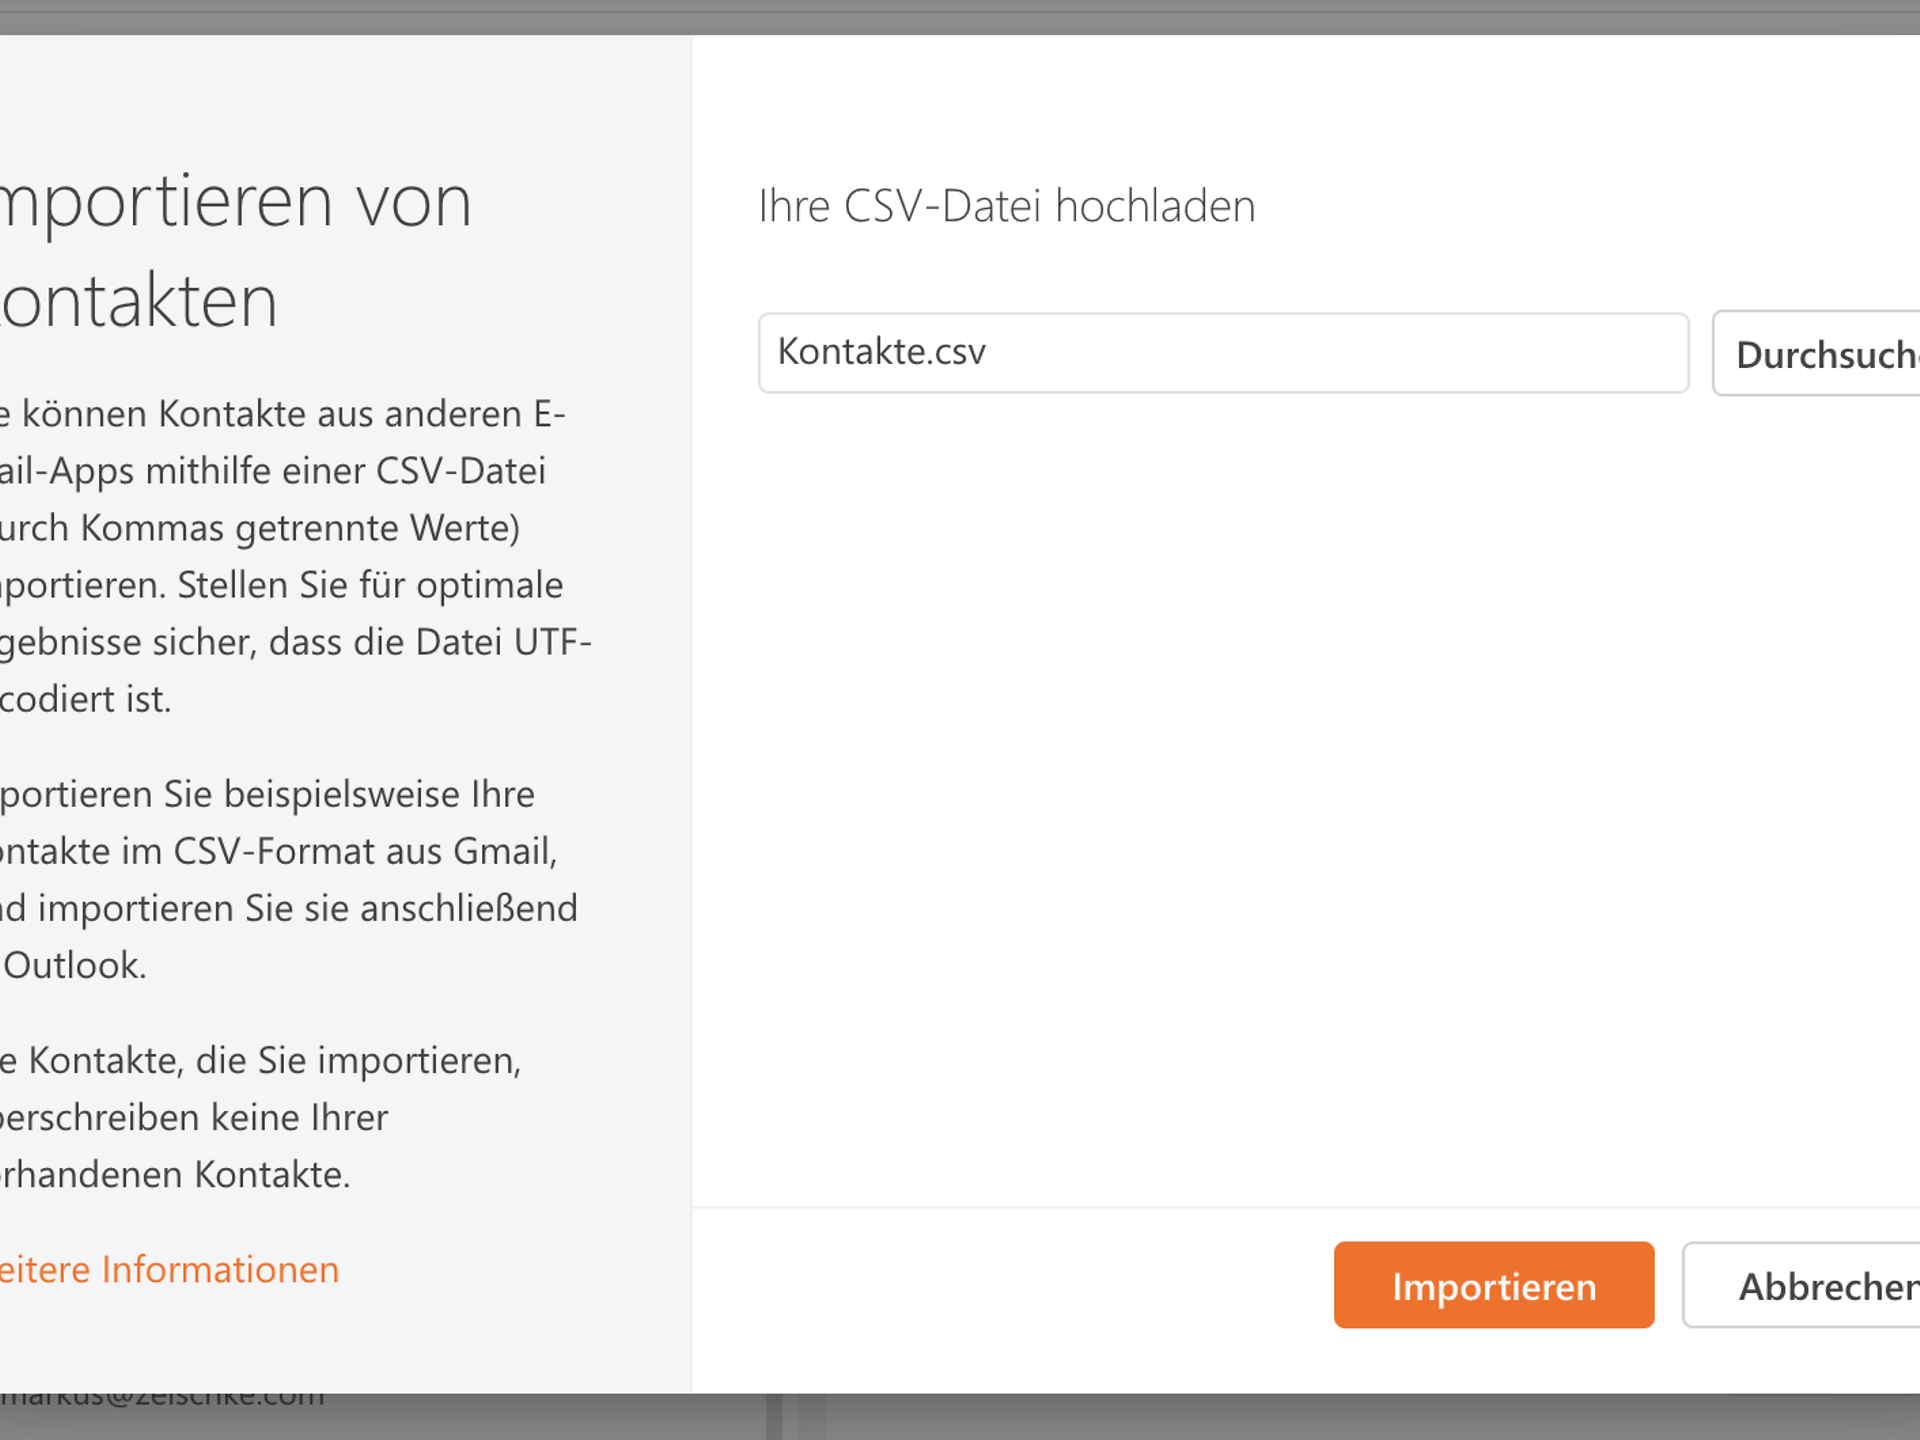
Step 5: In the next window, you will now be prompted to upload a CSV file. Click on the "Browse" button. Now select the CSV file you created earlier from your computer and confirm by clicking on "Import".
Step 6: Your contacts have now been successfully imported into Microsoft 365 or Office 365.
Notes on the CSV file: You can also create a new CSV file in which you enter your contacts in order to import them. You can use Excel for this, for example. In a blank workbook, add the desired content as column headings in the first row. These could be first name, last name, position, email address 1, telephone (private), telephone (business), mobile phone and website. You can find further options on this Microsoft page. You can then enter the desired information for a contact in each new row. The document should then be saved in CSV-UTF-8 format (separated by commas).
If you want to share a calendar with a colleague in Microsoft 365, you can do so via the Microsoft 365 portal, among other ways. First, log in to Office 365 and then switch to the web version of Outlook. Outlook will then open in a new browser tab. Click on the calendar icon on the left-hand side of the window.
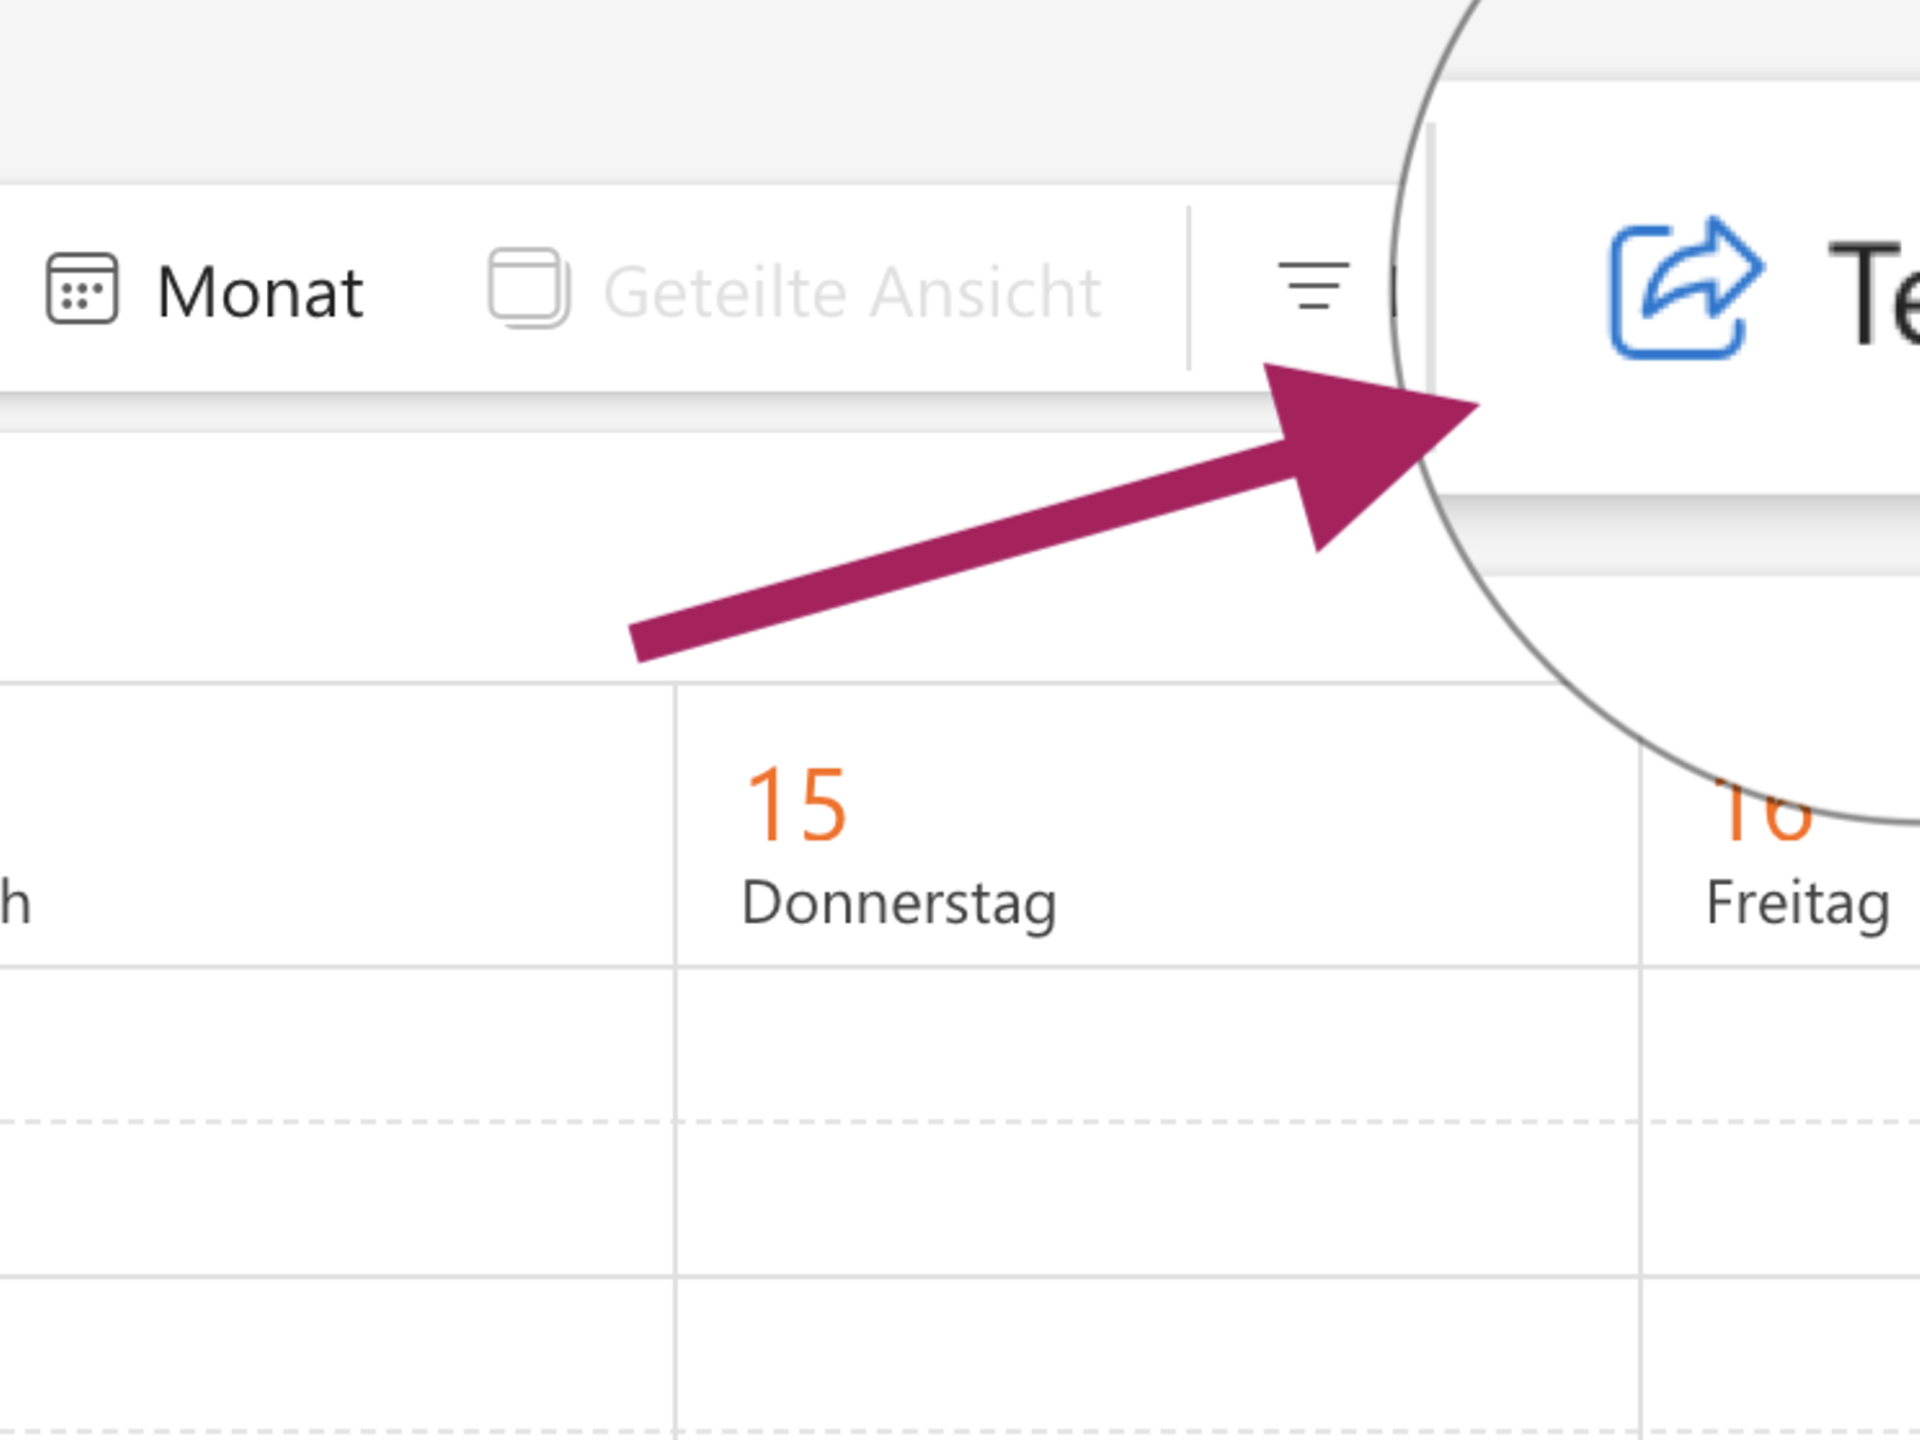
You will then find yourself in the Outlook calendar view. Now click on the Share button in the top right-hand corner of the window.
A window will now open where you can add people with whom you want to share your calendar. You can also manage the permissions of people with whom you have shared your calendar here.
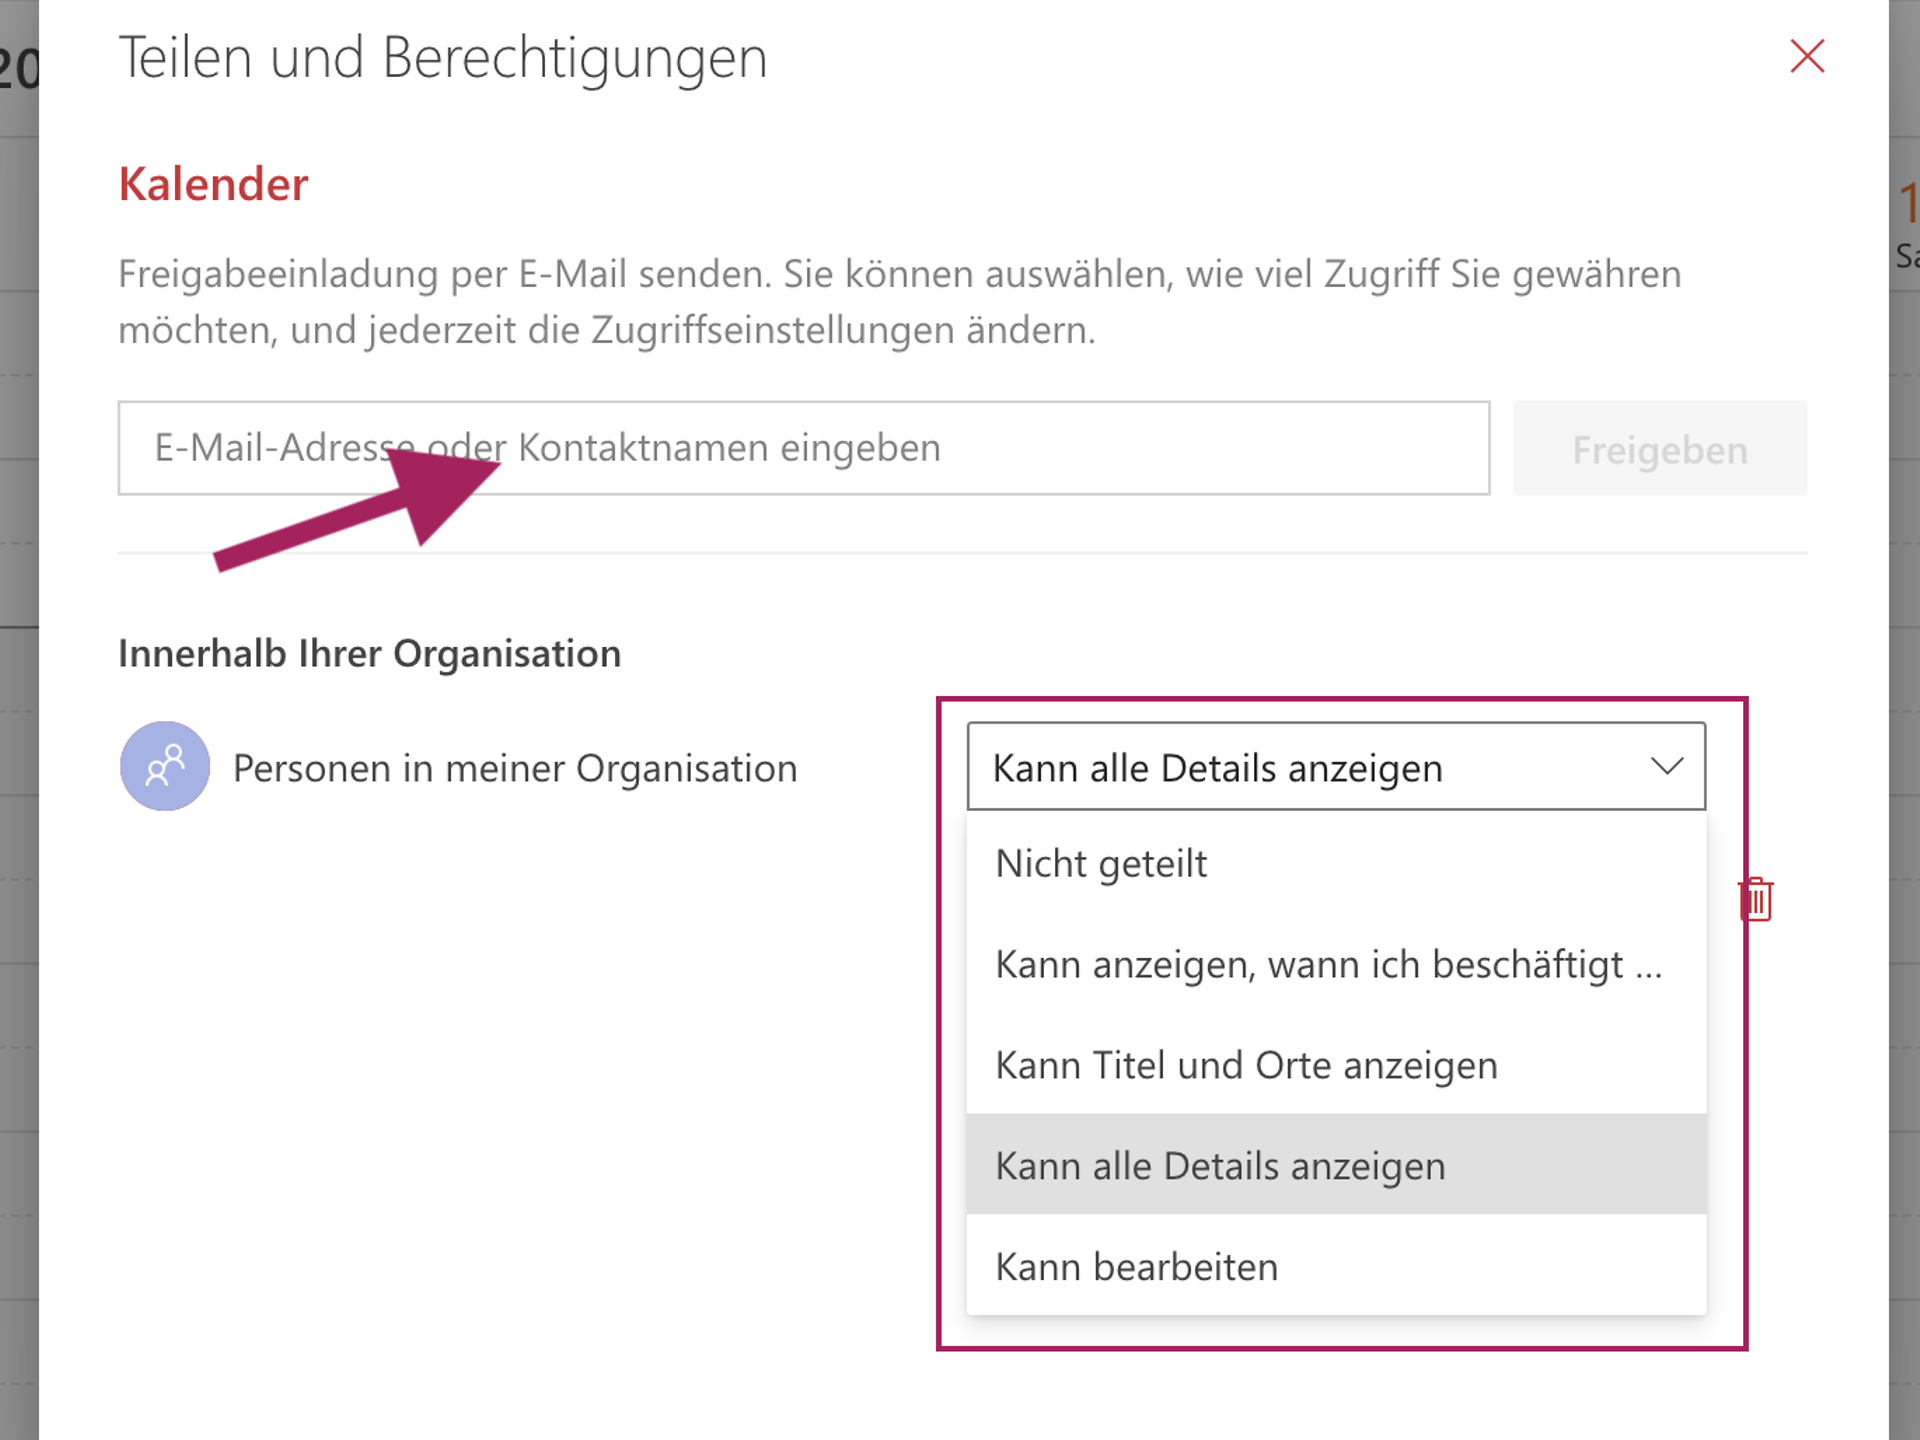
Enter the email address of the person with whom you wish to share your calendar and select the permissions you wish to grant them for your calendar:
The invited employee will now receive an email containing a link to add the shared calendar to their own Outlook Web App. The email also contains a link allowing the employee who created the share to grant access to their own calendar.
In the Microsoft 365 portal, you will find the calendars shared with you in the "People's calendars" section on the left-hand side. There, you can view them, overlay them or remove them again.
How to share calendars in Outlook on Windows and macOS
Follow these steps to share a calendar in the Outlook application on Windows:
On Mac, the procedure and user interface differ slightly:
Do you use other email providers such as Gmail, GMX or T-Online in addition to Microsoft 365? No problem – we'll show you how to access and manage all your emails centrally via Outlook.
The market for email providers is huge: various free email services (freemailers) such as Gmail, GMX, Web.de, T-Online, Strato and others offer email services. However, as users can quickly lose track of things when using different email services, it makes sense to access them via a central system – e.g. Microsoft Outlook. Since access to online mailboxes is now largely via the Internet Message Access Protocol (IMAP), it is fairly easy to access multiple email accounts bundled together via Microsoft Outlook.
The big advantage: thanks to IMAP, emails are retrieved from the respective server but are no longer deleted there – as was the case with the POP3 transfer protocol. Thanks to the synchronisation between Outlook and the third-party provider, emails are available in both systems after connection – worldwide and at any time. To connect Microsoft 365 or Office 365 to an external email system, simply allow Outlook to access the user mailboxes of the source email system. This is done by entering the external email address and user password in Outlook in the "Add account" section. Emails from a T-Online account can also be accessed via Outlook in this way. But how exactly does this work?
Not only can emails be accessed via Outlook, but your private calendars and address books can also be integrated into Office with minimal effort. This works via a Personal Store File (PST). This file format, which belongs to Outlook, can be used to store various information such as tasks, notes, emails and calendar entries in order to export them from Outlook or import them from an external account. To use private calendars from other providers, the relevant data should be saved in such a PST file. Microsoft provides several methods for importing information from other programmes or files. From manual file import to automated mass migration, there are many ways to use external emails, calendars and address books in Outlook:
Larger companies usually have their own Exchange server for sending and receiving emails. Office work becomes really convenient when existing directory services and the local installation of Exchange Server, Teams or SharePoint are integrated with Editions. Another practical option for companies is to outsource their Office applications to the cloud. This allows all Office programmes to be launched via a web browser, making time and space restrictions a thing of the past.
Thanks to Exchange Online, emails, contacts and calendars are always up to date, wherever you are, and can also be accessed from anywhere with an internet connection. Existing local Exchange servers can be easily migrated to Microsoft 365 or Office 365 with minimal effort. Microsoft offers three different methods for administrators to migrate all emails, calendar information and contacts from local user mailboxes to Office 365:
Option 1 – Cut-over migration: With a cut-over migration, you migrate all local mailboxes to Microsoft 365 or Office 365. You should use cutover migration if you plan to migrate your entire email environment to Microsoft 365 or Office 365 and manage the associated user accounts there. You can migrate a maximum of 2,000 mailboxes from your local Exchange environment to Microsoft 365/Office 365 using this method. However, the recommended number of mailboxes is 150. A larger number can have a negative impact on performance. Contacts and distribution groups are also migrated. Detailed information on the procedure can be found in this Microsoft documentation.
Option 2 – multi-stage migration: In the migration dashboard, it is also possible to configure a multi-stage migration. Using a CSV file, administrators can define individual users whose mailboxes are to be integrated into Office 365. Multi-stage migration is particularly suitable for companies that manage more than 2,000 mailboxes. Detailed information on this method can be found in this Microsoft documentation.
Option 3 – hybrid migration: If you already work with local and online mailboxes in your company and would like to integrate them completely with Microsoft 365, the hybrid migration method is a good choice. This import method works step by step in small batches and is recommended if you have been working with Exchange 2013, for example.
Would you like to transfer your existing Outlook data or an entire IMAP mailbox to an Exchange Online mailbox? Or are you planning to migrate from a local Exchange server to Microsoft 365? We explain what you can do.
If you have only used Outlook in conjunction with a non-Exchange server up to now, your calendar and contacts will only be stored locally. Below, we describe how you can transfer both to your cloud-based mailbox.
First, you need to export the existing Outlook structure. To do this, click on "File" at the top left of the Outlook window. This will open the menu shown below. Click on "Options". The options menu will now open. Switch to the "Advanced" tab and locate the "Export" section.

The "Import/Export Wizard" will now open. Here, select the option "Export to file".
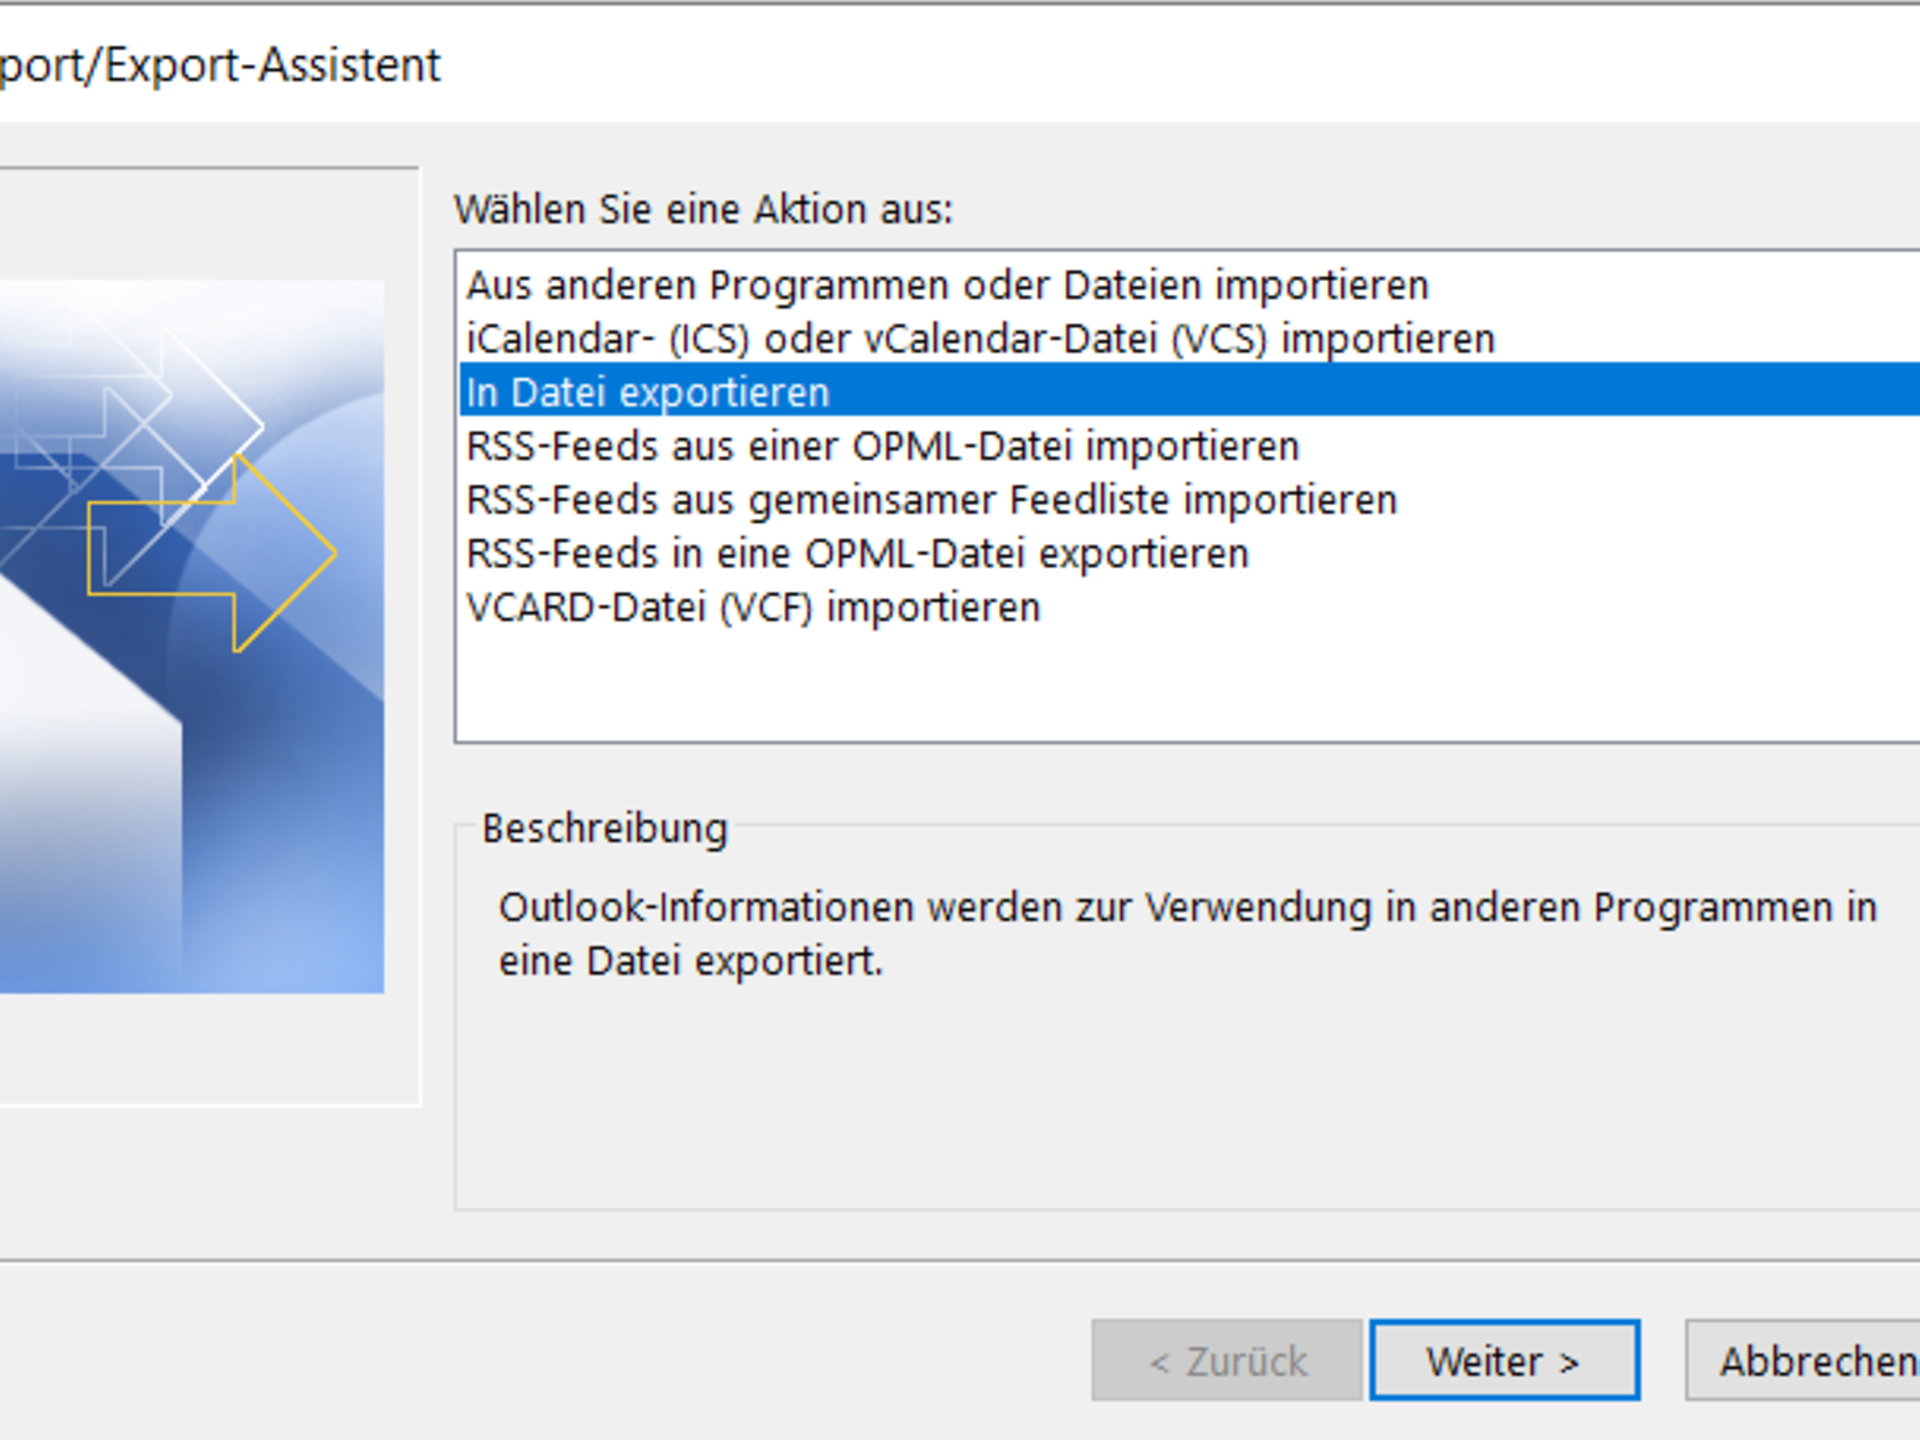
In the next step, select the file type to be created: "Outlook data file (.pst)". In the next step, select which Outlook areas you want to save in the export file. Click on the name of your email account to export the entire mailbox. After clicking "Next", select a storage location and give the export file a name. The default name is "backup.pst".
If the Outlook data file and the integrated mailbox are to be exported, this process must be performed once for each account. Once all accounts have been exported, you can either remove the current Outlook profile or create another profile.
To do this, click on 'File' in the top left corner of the Outlook main menu and switch to the 'Information' tab. Then select 'Manage Profiles' from the 'Account Settings' menu.
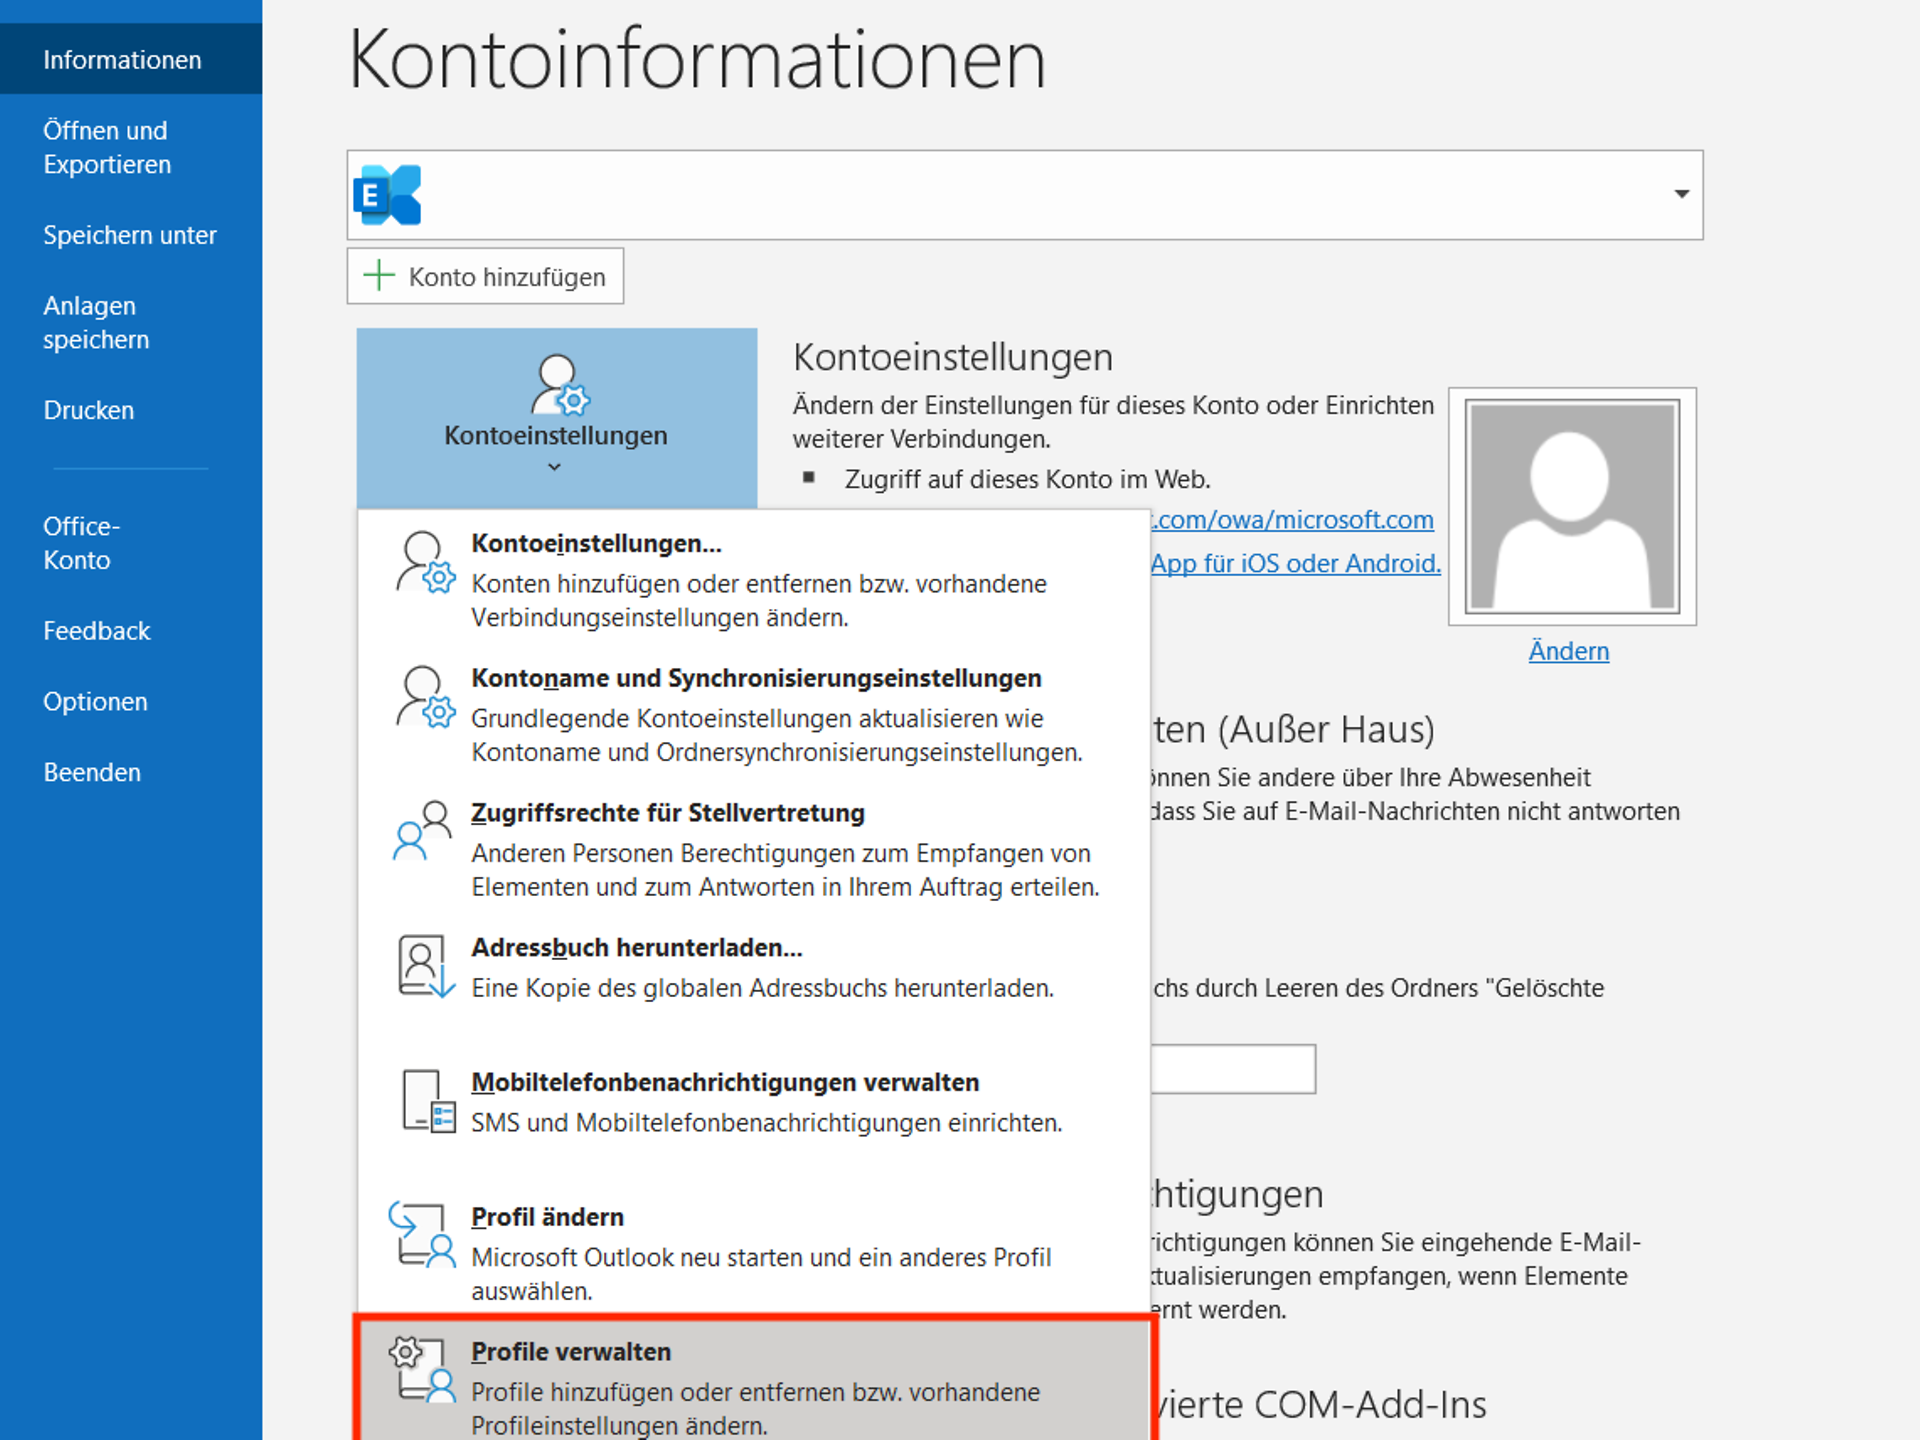
In the "Profiles" section, click on the "Show profiles..." button. Now you can remove the current Outlook profile and add a new one. After starting Outlook, you will be asked to specify a mailbox. Enter the login details for your Microsoft 365/Office 365 mailbox here.
Then switch back to the Import/Export Wizard. This time, select the option 'Import from other programmes or files'.
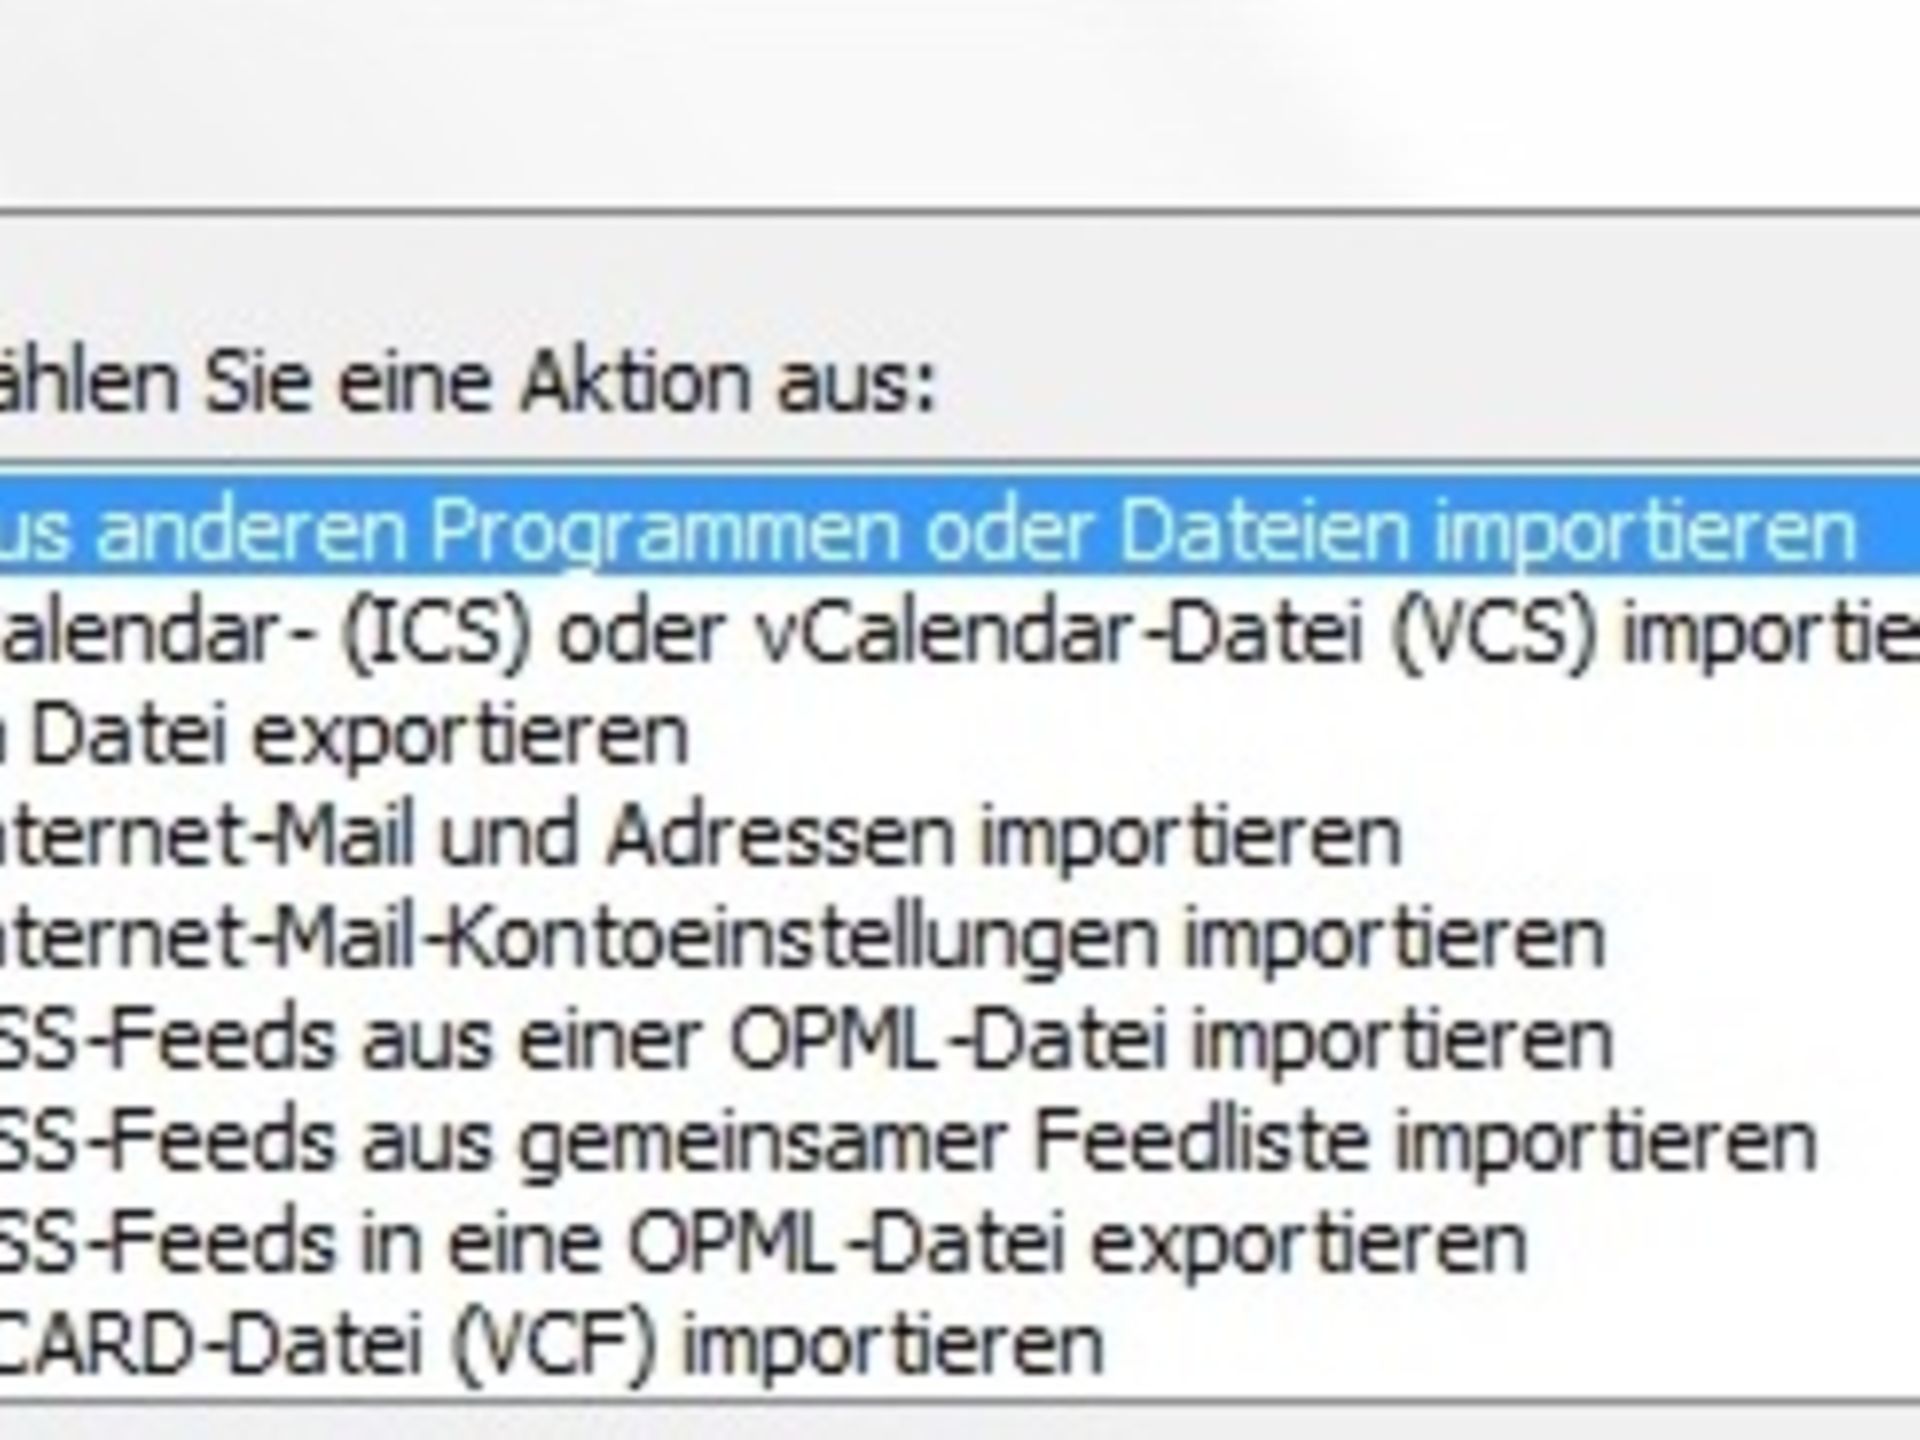
Then select the file you want to import. An overview of the folders and files to be imported will now appear, and you can choose which mailbox the import should be made to. Depending on whether you want to migrate multiple accounts, this process must be carried out once for each file to be imported.
The import is now complete. All emails, contacts and calendar files are available in your Microsoft 365 or Office 365 email account. The local Outlook now automatically synchronises the data with Exchange Online. You can now also access the mailbox to the same extent via the Outlook Web App.
To migrate emails from your old email provider (IMAP) to Online, we recommend using the Microsoft 365 Admin Centre:
Using the Microsoft 365 Admin Centre for IMAP migration
After adding your users to Microsoft 365 or Office 365, you can use IMAP (Internet Message Access Protocol) to migrate these users' emails from their previous server to Exchange Online.
Step 1: Log in via the Microsoft 365 Admin Centre.
Step 2: Navigate to Setup > Data Migration.
Step 3: A page will open where you will find a selection of common email providers.
Step 4: Now perform the following steps:
Your provider will be listed: Select your provider to begin the migration. In the next step, a page will open where you will see all your users listed with their source email addresses pre-filled.
Please note: When migrating from Gmail, your users must create an app password, which you will use instead of the users' account passwords. If you want to migrate emails from Outlook or Hotmail, your users must set up two-factor authentication and also create an app password. The app password is also used here instead of the account password when connecting Hotmail or Outlook to Microsoft 365 or Office 365.
Your provider is not listed: Select Other email sources.
On the following page, you must now manually enter the IMAP server name and the correct port, and select the encryption type. You can usually find this information from your email provider. Add the email address of the mailbox to be migrated and the corresponding password.
Confirm now by clicking Save and the connection will be tested. You will then see the users you have added listed on the Email Migration Status page with the email addresses you have provided.
This and the following steps are now the same for all email providers:
Please note: In some cases, domain owners may need to create DNS records for Microsoft after migration is complete so that emails can be delivered to Microsoft 365 or Office 365 mailboxes. To add your own domain, follow the steps on this page.
Important information about migrating IMAP mailboxes
The following restrictions apply when migrating IMAP mailboxes to Microsoft 365 or Exchange Online:
Additional ways to migrate IMAP mailboxes to Exchange Online
In addition to the convenient method via the Microsoft 365 Admin Centre, Microsoft also offers other ways to migrate IMAP mailboxes to Exchange Online. You can find detailed instructions for this in the Microsoft documentation:
Nutzen Sie hier unsere weiteren Kontaktkanäle, um Ihr Anliegen zu lösen.


We are glad we could help!
Please feel free to use our contact channels at any time so that we can resolve your issue.